
Installing a new light fixture is one of the easiest ways to refresh a room. A fresh fixture can brighten the space, improve style, and create a more comfortable place for daily life. The good news is that many homeowners can complete this project with basic tools and careful planning. However, safety should always come first because electricity requires extra attention. Learning the correct steps helps prevent mistakes and builds confidence before starting. Whether replacing an old fixture or upgrading the look of a room, proper lighting installation begins with preparation, safety, and the right technique. By following these steps, anyone can complete the job carefully while protecting both the home and everyone inside.
Start with Safety Before Touching Any Wires
Every electrical project begins with safety. First, turn off the power at the circuit breaker instead of only using the wall switch. Next, test the wires with a voltage tester to confirm that no electricity is present. Never assume the power is off without checking. Gather all tools before starting. This saves time and reduces mistakes during the project.
“Electricity cannot be seen, so every wire should be treated as live until proven safe.”
Basic tools include:
● Screwdriver
● Voltage tester
● Wire stripper
● Wire connectors
● Ladder
● Safety glasses
Finally, work in a dry area with good lighting. If the wiring looks damaged or confusing, stop the project and seek qualified help. Taking extra time now greatly reduces the chance of injury later.
Remove the Old Light Fixture Carefully
Once the power is confirmed off, remove the existing fixture with care. Begin by taking off the light bulbs and decorative cover. Then loosen the mounting screws while supporting the fixture with one hand. This prevents it from falling unexpectedly. If the wiring arrangement looks unusual, take a clear photo before disconnecting anything. Many homeowners searching for how to replace ceiling light find that photos make reinstallation much easier.
After removing the fixture, inspect the electrical box. It should remain firmly attached and show no cracks, rust, or loose parts before the new fixture is installed.
Prepare the New Fixture Before Installation
Preparing the fixture before climbing the ladder saves both time and effort. Open the package carefully and compare every part with the instruction sheet. Make sure all screws, brackets, and wire connectors are included.
Read the manufacturer’s instructions completely because installation steps can vary slightly between models. If the fixture includes adjustable parts, assemble them before connecting the wires. Good preparation helps make lighting installation in Riverside CA smoother while reducing delays during the final assembly.
Connect the Wires the Right Way
Correct wiring keeps the fixture working safely for years. Match each wire by color before securing the wire connectors. Normally, black connects to black, white connects to white, and the ground wire connects to the grounding screw or green wire. Twist the wires together firmly before tightening each connector. Then gently pull each connection to confirm it stays secure.
“A secure wire connection is one of the most important parts of any electrical project.”
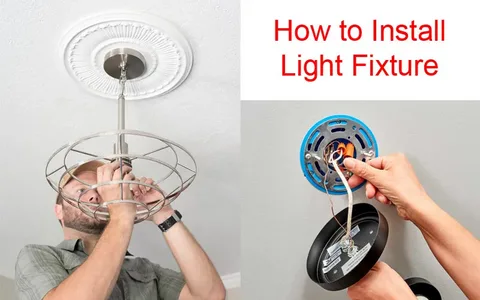
After wiring is complete, carefully fold the wires into the electrical box without forcing them. Next, attach the mounting bracket and secure the fixture according to the manufacturer’s instructions. Many people learning how to replace light fixtures in ceiling find that taking each step slowly produces the best results.
Test the Fixture Before Finishing the Job
After the fixture is mounted, restore power at the circuit breaker. Then turn on the wall switch and check that the light works correctly. If the light does not turn on, switch the power off again before inspecting the wiring. Never touch electrical connections while power is active. Next, make sure the fixture sits level against the ceiling. Tighten any loose screws if needed, but avoid over-tightening because that can damage the fixture or electrical box.
Watch for these common warning signs:
● Flickering lights
● Buzzing sounds
● Loose mounting
● Warm fixture base
A successful test confirms that the installation is safe and ready for everyday use.
Avoid Common DIY Installation Mistakes
Even a simple project can go wrong without careful attention. Fortunately, most mistakes are easy to avoid. Rushing through the process often leads to loose wire connections or missing safety steps. Always confirm that the fixture is supported by a proper electrical box. A heavy fixture may require a stronger mounting box for safe installation.
In addition, avoid mixing wire colors or leaving exposed wire outside the connectors. Although fixtures look similar, installation steps may differ slightly. Taking extra time to inspect every connection before restoring power helps prevent future problems. So, choosing a visual comfort lighting in Redlands CA also improves the overall quality of the finished installation while increasing long-term safety.
Know When Professional Help Is the Safer Choice
Many homeowners can replace a standard ceiling light successfully. However, some situations require professional experience. Older homes may contain outdated wiring, damaged electrical boxes, or unexpected electrical issues that need special attention. Some decorative fixtures also require extra support because of their weight. Others include advanced controls or smart features that need additional wiring knowledge.
For homeowners interested in stylish and functional lighting fixtures in Ontario CA, following the manufacturer’s installation instructions is especially important because premium fixtures often include specialized mounting systems.
Simple Maintenance Helps Your Fixture Last Longer
Installing the fixture is only the beginning. Regular care helps maintain brightness, safety, and appearance for years. Dust the fixture often with a soft cloth after turning the power off. Clean glass shades according to the manufacturer’s recommendations to maintain clear, bright light. Proper lighting installation combined with routine maintenance improves performance, extends the fixture’s lifespan, and keeps the space looking its best.
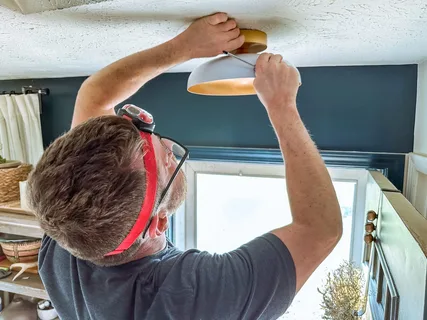
A Brighter Home Starts with the Right Installation
Installing a light fixture can be a rewarding DIY project when safety remains the top priority. Careful preparation, proper wiring, and thorough testing help create reliable results that last. Taking time to follow each step also reduces the risk of mistakes while improving the appearance and function of any room.
Trusted electrical professionals, including Todd Peters Electric, understand the importance of safe installation practices and following electrical codes. Whether tackling a simple replacement or learning new DIY skills, careful planning and patience help create a brighter, safer home.
FAQs
1. Can I install a light fixture without professional experience?
Yes, many homeowners can install a light fixture safely by following instructions, turning off power, using proper tools, and carefully checking every electrical connection before testing.
2. How do I know if the power is completely off?
Always use a voltage tester after switching off the circuit breaker. Never rely only on the wall switch because electricity may still be present.
3. How long does a typical light fixture installation take?
Most standard light fixture installation projects take between 30 minutes and two hours, depending on fixture design, wiring condition, preparation, and overall installation experience.
4. What should I do if the new light does not turn on?
Turn the power off immediately and inspect all wire connections. Confirm each wire is connected correctly and securely before restoring power and testing again.
5. When should I call a licensed electrician instead of doing it myself?
Contact a licensed electrician if wiring appears damaged, breakers trip repeatedly, electrical boxes are unstable, or the installation involves complex electrical modifications or heavy fixtures.
